Sunday, 11 December 2011
Sunny Solutions
Guilty of overindulging in bottled water? You’re certainly not the only one.
The number of “health-conscious” people in Pakistan, who carry their bottles of mineral water while rushing off to work, sauntering in parks and shopping at malls, is on the rise. Bottled water is now ubiquitous in Pakistan — not only is it on the checklist of essentials of most people; it’s also served during conferences and business meetings. And there are figures to prove its rampant consumption. The use of bottled water — typically considered as high quality and safe drinking H20 — is growing by 40 per cent each year. In the year 2000 alone, Pakistan experienced an astonishing 140 per cent growth in bottled water usage — the highest in Asia. It is estimated that the cost of mineral water for one person is roughly Rs1,400 per month — equivalent to Rs. 16,800 per annum. That is a lot of money for something that is our basic right: drinkable water!
The increasing acceptance of bottled water has obviously made consumption of tap water — generally associated with nasty stomach bugs — unthinkable in today’s age. But what if I told you that you can purify water, straight from the tap? You won’t even have to filter or boil it. All you need are some empty PET (Polyethylene Terephthalate) bottles, clear tap water and some bright sunlight and you can start the solar water disinfection (SODIS) process at home! This process, developed by the University of Beirut in 1985, has been practiced in many countries and regions around the world, including Pakistan.
To purify your water by using sunlight, simply follow these steps:
Find PET bottles with a resin identification sign of 1. Your plastic water or juice bottles are safe to be reused for this project. The bottles must not contain more than 3 litres of water.
• Wash the bottles thoroughly with soup.
• Fill them with tap water. Make sure your tap water is visibly clean. This method is not very effective for hard water.
• Put on the cap and place the bottles in full sunlight for at least 6 hours. If it’s cloudy, keep them out there for two days.
Your water, without any added chemicals, is now ready to drink!
Despite being the simplest way to purify your water, SODIS has a few disadvantages:
• The process will only be fully effective on sunny days
• It does not work on hard water (water with high mineral con tent)
• It takes time and effort.
But look at the bright side (pun intended) of the entire procedure. It’s a natural, eco-friendly and healthy way of disinfecting your water and will allow you to save money in the long-term. And as far as the exertion required in disinfection is concerned, a light workout never harmed anyone!
So go ahead: make use of nature and purify your water the sunny way!
Published in The Express Tribune, Sunday Magazine, December 11th, 2011
Environmentalist, sustainability educator and a freelance writer. Co founder of Organic City Pakistan.
Sunday, 27 November 2011
Winter Colours and Flavours for Your Garden
Winter may feel cold and colorless but your garden doesn’t need to be monochrome. Nature presents us with stunningly vibrant foliage and flowers that adds warmth to your garden and gives you a reason to be out in the sun on a wintry day.
Using a blend of seasonal winter flowering plants in a variety of containers is an easiest way to brighten up your garden. Place it at your entrance, align it along the pathway or position it on your window sill, they will add interest to your garden for months to come.
Add some plants to hanging baskets and place them outside your windows to add a color to the view from inside.
A Spark of colors
Pleasing fusion of bulbs and winter-flowering plants adds sparks of colors to your garden. Select from your local bulbs such as the classic white tube roses or go for Lilies, Daffodils, Tulips or Amaryllus according to the city you live in. Plant large Indian Dahlia for a bold splash of colors or clusters of tiny Alyssum flowers in containers. If you have an ugly wall to hide, grow tall stunning Holy Hocks. Options are endless,but here are some must-haves for this season: Petunia, Carnation, Marigolds, Antirrhinum, Salvia, Calendula, Dahlia, Geranium, Lupin, Pansies and many more. Select according to your taste and space.
Add fragrance and flavour
Yes flavor! Why not play with edible plants, vegetables, herbs and flowers! Here are some ideas:
- Combine a bush cherry tomato plant with chives or marigolds in a hanging basket.
- Mix together pansies with strawberries.
- Use mixed verities of leaf lettuce as fillers between your other ornamental plants.
- Blend Dill with Nasturtium flowers which are edible!
- Blend a contrasting color Petunia with strawberries or hanging tomatoes. Imagine a purple petunia plant with yellow cherry tomatoes hanging right on your favorite corner!
- mix dwarf sweet pea with Purple Cabbage.
Use plants with lush green or colored foliage and different textures. Have some perennials and annuals too along with the seasonal plants. Bring together plants that have similar needs( sunlight, type of soil, water) and also keep in mind about the space they will need to grow.
The options are endless so why not create a garden this winter that not only has stunning colors but also something much more.
Published in Express Tribune Classifieds on Sunday 27th November, 2011
Image credit: Mehlum Sadriwala studios
Environmentalist, sustainability educator and a freelance writer. Co founder of Organic City Pakistan.
Wednesday, 9 November 2011
Brussels sprouts: Best buds
![]() |
| With their clusters of buds that look like tiny cabbages, Brussels sprouts are a rewarding plant to grow. |
Kitchen gardening is all about planting seeds which you have never sown before and being proud of your harvest. For me, growing Brussels has been a personal achievement.
The name comes from the city of Brussels in Belgium where, it is believed, selected cabbage varieties were cultivated in the 18th century. Clusters of tiny leaf buds resembling miniature cabbages grew along a thick stem and became famous as Brussels sprouts. They were named Brassica oleracea variety gemmifera, or simply, ‘garden cabbage bearing gems’. Closely related to kale, kohlrabi, cauliflower, broccoli and cabbage, Brussels sprouts are dark green and the miniature cabbages are typically 1-2 inches long, which explains why they are referred to as gems. The stalk itself can grow up to 3 feet tall.
Brussels sprouts contain sulforaphane, a chemical with anticancer and antidiabetic properties, along with indole-3 carbinol which improves DNA repair in cells, making it a true treasure for any vegetable garden.
Growing Brussels sprouts in your garden
Winter is the best time to grow good quality Brussels sprouts that have compact heads. On the other hand, hot temperatures result in loose tufts. Some heat tolerant varieties can be grown in spring or early summer. Brussels sprouts will love temperatures between 7-24c˚ and yield will peak somewhere within this range.
Brussels sprouts love well-drained and fertile soil. Prepare your pot or plot by adding lots of organic compost to the soil. Your aim is to achieve a PH level of 6-6.5. If the soil gets too acidic add lime.
Sow the seeds ¼ deep in a 14-inch terracotta pot or any other container of that size. For planting on a vegetable patch, transplant your 3-inch seedlings 20-24 inches apart with the same distance between rows. Brussels sprouts are slow growers and most of the varieties are harvested in 90-180 days.
Use companion plants such as beans, mint, dill, garlic, basil, sage and onions to repel insects and get better yields. Cabbage worms and aphids can ruin the experience of growing Brussels sprouts if you do not inspect your plants regularly for signs of pest attack. If you sense some trouble, use organic means of protecting your plants. If you see pretty white butterflies or moths fluttering over your plants, do not get too excited — they will lay eggs on your plants that will develop into cabbage worms or caterpillars.
Harvest and beyond
Brussels sprouts can be picked individually when the heads reach around 1-1.5 inches in diameter. The ones at the bottom of the stem mature first. You can also harvest the entire stem if you wish.
Brussels sprouts can easily be stored for up to three weeks by freezing. You can blanch your sprouts by following these simple steps:
- Separate each sprout from the stem and remove outer leaves.
- Wash it thoroughly to get rid of insects and dirt.
- Bring a pan of water to boil and blanch your sprouts for roughly three minutes. Leave larger ones for an extra minute.
- Now soak them in ice water for about the same length of time.
- Store in an airtight bag or a container in the refrigerator to use later.
The key to retaining most of the nutrition in your Brussels sprouts is to not overcook them.
There is nothing better than growing your own food — not only does it add flavour to your meal but is also a feast for the eyes.
Published in The Express Tribune, Sunday Magazine, November 6th, 2011.
Environmentalist, sustainability educator and a freelance writer. Co founder of Organic City Pakistan.
Sunday, 2 October 2011
Eastern promise: Growing Lemongrass
Lemongrass (Cymbopogon citrates) is one of the staple ingredients in Asian cuisine, where it is used in everything from soups and curries to green teas. Lemongrass is a frost-tender perennial which can grow up to six feet tall and spread two-three feet wide. Its long, thin bright green leaves are packed with a dense citrus flavour. The stalk and leaves both contain a very distinct and strong aromatic oil called citral, which smells like — you guessed it — lemons!
Now that lemony smell isn’t just refreshing, it also keeps away those tiny blood-sucking terrors we call mosquitoes. While some feel that simply planting lemongrass is enough, the real mosquito-repelling benefit comes from its essential oil, which can work as an effective replacement for commercial insect repellents.
That’s not all. If you are someone who values organic over chemical health and beauty products, lemongrass is just what you need. Lemongrass essential oil is known for its antiseptic and revitalising properties. It’s a perfect natural toner for your skin. It improves circulation, tones muscles, cures acne and neutralises oily skin.
Its diuretic properties promote digestion, remove excess water and toxins from the body and reduce swelling. Being an effective astringent, lemongrass strengthens the contraction of gums and hair follicles resulting in stronger teeth and less hairfall. In case of injuries, it helps in clotting blood quickly.
Lemongrass is valued for its antipyretic (fever-reducing) properties too. A few cups of lemongrass tea can bring down even high fevers. Essential lemongrass oils and teas can also help you recover from depression by uplifting the spirit thanks in no small part to its smell. It helps relieve muscular pains too.
Besides this, lemongrass oil also assists in treating nervous disorders such as shaking hands or limbs, and lack of reflexes by strengthening and activating nerves.
There is good news for lactating mothers. Apart from the innumerable reasons to include lemongrass in your diet, lemongrass oil is also a popular galactagogue agent that not only improves the quality of milk produced but also increases the quantity. However, you must not consume lemongrass if you know you are pregnant because it can lead to a miscarriage.
Growing lemongrass in your garden
Now let’s get down to the nitty-gritty of how to grow this miracle plant.
Lemongrass is hard to germinate from seed but if you are able to get a few seedlings through germination you should be more than happy!
Spread the seeds in a small container filled with sand and compost (70:30) and cover lightly with moist compost. Seal the pot with a plastic bag to maintain the moisture and to control the temperature. With a steady temperature of 20-22 degrees Centigrade, the seeds will germinate in 25-40 days. Fluctuating temperature will result in poor or failed germination.
When the seedlings are large enough to handle, transfer them to individual pots and keep them in partial shade. Since these are tropical plants, they will grow best in moist soil in a sunny spot. Gradually introduce your plants to full sun.
Divide and rule
Personally, I have never grown lemongrass from seeds. Instead, once a year, I divide the plants to propagate them. You can do the same by buying a plant from a nursery. My plant was a present from a friend and it turned out to be one of the best growing plants in my garden. The best time to propagate your plants by dividing is in early spring or autumn. The plant can be separated and replanted as soon as it has developed strong roots. To divide them, carefully remove the entire plant from its pot and shake it gently to loosen the soil but do not remove it all. Carefully separate a stem along with its roots from the others and replant it. Take care of the new plant by watering it and keeping it under partial shade for a few weeks.
Lemongrass can be grown in pots or as a border in your garden. They will love a 12-14 inch container and occasional feed or organic compost. The plants are insect repellents themselves and because of that they are virtually pest-free.
Harvesting and beyond
Summers will bring flowers to lemongrass that will soon produce hundreds of seeds that you can save. Once your plant is three months old, you can start harvesting its leaves by cutting them from the bottom, just near the stem.
You can use them fresh or dry and you can store them in airtight containers to use later.
Freeze your herbs instead of drying
Drying is a classic way to store herbs for later use while preserving the flavour and aroma. However, classic drying means that you will lose the colour. Well, this handy technique lets you preserve the colour as well!
Pick fresh leaves of lemongrass, rinse properly and chop into one inch pieces. Fill your ice cube trays with water and add a few cuttings in each. Most herbs (especially mint) look attractive frozen in an ice-cube and can even be used to add zing to a cold drink.
You can also store lemongrass by making small packets of the herb using butter paper and freezing it in an air tight container.
Every garden should have this fantastic plant that tastes and smells like lemon, cures uncountable illnesses, makes skin beautiful, reduces fat, makes teeth stronger and hair stunning, soothes senses, repels insects and makes the garden greener!
Published in The Express Tribune, Sunday Magazine, October 2nd, 2011.
Environmentalist, sustainability educator and a freelance writer. Co founder of Organic City Pakistan.
Tuesday, 20 September 2011
The War Against Mosquitoes: Protecting your home
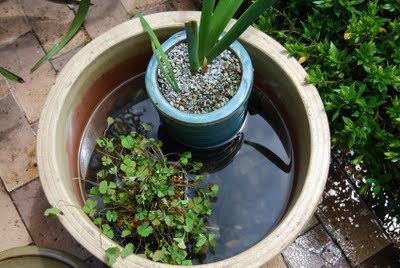
Breeding ground: In the fight against the Aedes mosquito, it is key to remove standing water from all areas around your house and garden.
The enemy is at large and hidden among us. It is attacking us from all sides. It's time to take charge of the situation and take our grounds back!
Track down your enemy!
Watch out for a 2-3 mm black mosquito with white stripes on its legs and body called Aedes, which has, unfortunately, lived up to the literal meaning of its name: "unpleasant."It targets children and adults equally. Its modus operandi includes biting an infected person and then biting another person to spread the sometimes deadly dengue fever virus. Our enemy lives among us in cities and villages in empty pots and discarded containers that hold standing water, and of course water storage tanks, and it has breeding habits different than the mosquito that carries malaria.
We have lost our men, women and children in this war. It's time to declare war against the mosquitoes.
Chose your weapons!
Let's face it. Our enemy is almost invisible and its coming from directions unknown. We can not predict where its going to attack next. It can be us, it can be someone we love.We have two choices. We can use chemical warfare. It will surely kill the enemy, but it will also have some side effects. On the other hand, we can use much safer weapons that will only kill the enemy and protect us without any loss.
Organic Pakistan (a center for agriculture and urban farming) has developed a plan of action using tested and trusted natural control and cure methods that will always work if done properly. The best part is that there are no side effects and the plan is cost effective too!
Mosquito-free homes and workplaces are absolutely essential. Here are a few things you can do to make that happen:
Double your guard
Introduce mosquito-repelling plants around you. Plant rosemary, mint, lemon grass, catnip and marigold in your garden, containers, hanging baskets or window boxes. Mint and marigold are easily available in most nurseries.
Attack on their ground
Do not let water stand in trays under pots and clean your birdbaths once a week.
Make them run for their lives
Mint works like magic to repel insects and has been used as a mosquito repellent for centuries. Hang or place dried mint leaves in a sachet around the house or near windows.
Make your own mint mosquito repellent by taking a few fresh sprigs of mint and fresh citrus peelings and adding boiling water to the mix. Let it sit over night. Strain and add an equal amount of rubbing alcohol. There you have it! Mix it well and use it on your body to repel mosquitoes where ever you go.
![]() |
| Hermal, also known as "wild rue", is a thicket-like herb that has many medicinal properties. |
Smoke them out by using hermal-seed smoke to fumigate your rooms daily.
Heal yourself
The good news is that 80% of infected people have minor symptoms, such as high fever, and only 5% will have severe conditions, while a small number will face life-threatening complications. People suffering from conditions such as diabetes and asthma have more chances of suffering from life-threatening dengue fever.If you suffer from high fever, muscle and joint pain, headaches, pain behind the eyes, nausea and vomiting, you must visit your doctor and follow professional treatment.
Remember, healing doesn't have to be a series of torturous events. These simple and healthy drinks should be part of your treatment plan: i) the juice of a half lemon squeezed into a glassful of fresh apple juice should be taken thrice daily to fight dengue fever; and ii) select your favorite from, or a combination of, grapefruit, guava, bell pepper, tomato and lemon or lime juices to strengthen your immune system.
Make your own herbal tea to recover from dengue fever
Mix one cup each of fresh lemon, ginger and garlic juice and add one cup of apple cider vinegar to it. Bring this mixture to a boil and let it simmer until you are left with three (3) cups. Turn off the heat and let it cool. Once it's cold, add four (4) cups of any honey (preferably acacia honey) and combine the mixture. Use an airtight container to store it in the refrigerator.It's recommended to put two tablespoons of the mixture in a glass of water and drink it daily on an empty stomach.
Remember, the best strategy in any war is to never let down your guard. Your enemy might have the advantage of a surprise attack, but you can be prepared to eventually reverse the situation in your favour. Follow our action plan and buttress your defences. Everything you need to protect yourself is in your home, or close at hand.
published at Newsline Magazine on 20th September,2011 http://www.newslinemagazine.com/category/lifestyle/home/
Environmentalist, sustainability educator and a freelance writer. Co founder of Organic City Pakistan.
Subscribe to:
Posts (Atom)
further reading
crops in pots