Sunday, 23 December 2012

شاہی سبزی : بینگن


Written by Zahra Ali
Translated by Adeel Anjum

یہ بات میری سمجھ سے بالا تر ہے کے لوگ کیسے کہ سکتے ہیں کے ان کو بینگن پسند نہیں جب کے خالق کو اس کے رنگ سے اور فرانسیسی عوام کو اس کے نام سے محبت ہے۔ "جیف سمتھ"

یہ شاید بینگن کا نایاب رنگ ہے کے جس سے اس کی تاجوری بیان ہوتی ہے اور جو قدیم تہذیبوں کے خداوں کا رنگ ہے جس نے جیف سمتھ کو یہ کہنے پر مجبور کر دیا کے "یہ بات میری سمجھ سے بالا تر ہے کے لوگ یہ کیسے کہ سکتے ہیں کہ ان کو بینگن پسند نہیں جب کہ خالق کو اس کے رنگ سے اور فرایسیسی عوام کو اس کے نام سے محبت ہے۔"                                                     


اور یہ بات قطعاٰ حیران کن نہیں کے یہ رنگ شاہی خاندان کا نشان ہے،کیوں کہ یہ مخصوص اور نایاب ترین رنگ ہے جو قدرت اپنے اندر سجائے ہوئے ہے ۔                                                                                                                         


بینگن کا خاص نام  {ایگ پلانٹ} اس کی ایک سفید قسم کی وجہ سے دیا گیا ہے جو مرغی یا راج ہیس کے انڈوں سے مشابہت رکھتا ہے۔ دوسری جانب اصل میں یورپ میں پایا جانے والا بینگن گہرا جامنی رنگ کا ہوتا ہے۔ چین میں پایا جانے والا بینگن بنفشی رنگ کا ہوتا ہے۔ تھائیلیڈ اور بھارت میں سبز اور پیلی قسم بھی کاشت کی جاتی ہے۔ بھارت کے کچھ علاقوں میں مالٹائی رنگ کا بینگن بھی کاشت ہوتا ہے۔ بینگن دو رنگے بھی ہوتے ہیں۔ یہ شاندار سبزی گہرے جامنی رنگ سے لے کر سفیدی مائل رنگ تک بہت سے رنگوں میں پائی جاتی ہے۔ باقی تمام رنگ بہت نایاب ہیں اور دنیا کے چند خطوں میں کاشت ہوتے ہیں۔                                                                                 

بینگن کی تاریخ اس کے رنگ کی مانند ہبت زرخیز ہے۔ یہ عربی، یونانی، رمانی اور ایشیائی تاریخ کا خاص حصہ رہا ہے۔ امریکی کینیڈین اور آسٹریلوی لوگوں نے اسے ایگ پلانٹ کا نام دیا جو در اصل فرانسیسی زبان کا لفز ہے۔ ہندی فارسی اور جنوبی افریقی لوگ اسے برنجل کہتے ہیں۔ بینگن کی اپنی تاریخ نہایت شاندار ہے کہ کیسے مختلف خطہء زمین کے لوگوں نے اس کے لیَئے خوبصورت نام چنے۔ اسے آپ جو بھی نام دیں،دیگر سبزیوں میں اسے اپنی الگ خصوصیات کی وجہ سے خاص مقام حاصل ہے۔ یہ رنگ اور نام کے علاوہ شکل اور سائز میں بھی مختلف پائے جاتے ہیں۔ انڈے کی طرح بیضوی، لمبوترا، گول نما،گھنٹی نما، انگلی نما اور مارغولے کی شکل اس کی چند اشکال کی اقسام ہیں۔ اس کا پھل انگور جتنا چھوٹا بھی ہوتا ہے اور 16 انچ تک لمبا بھی ہو سکتا ہے۔بعض علاقوں میں بینگن 2 پونڈ وزنی کاشت ہوتاہے۔ بینگن کی کاشت ایک منافع بخش کام ہے۔ یہ سبزی گرم درجہ حرارت میں خوب نشو و نما پاتی ہے اور ہمارے خطے کے لیئے بہترین انتخاب ہے۔  بیج آدھا انچ گہرائی میں بوئے جاتے ہیں اور مٹی کو نم رکھا جاتا ہے۔ اسے بیجوں کی صورت میں اگانا بہتر ہوتا ہے اور بعد میں جب پتے نمودار ہوتے ہیں تو اسے منتقل کر لیا جاتا ہے۔ پودوں کے درمیان 16 انچ کے فاصلہ رکھا جانا چاہئے اور قطاروں کے درمیان 24 انچ کا فاصلہ۔ بینگن ٹماٹروں اور مرچوں کی طرح بحت آسانی سے مطبان میں پیدا کئے جا سکتے ہیں،۔ ان کے لئے کنستر یا ریت اور مٹی سے بنا ہوا مرطبان جو کہ 12 انچ یا اس سع بڑا ہو نہائت ہی موزوں ہے۔                                  
 

خوراکی ریشہ، حیاتین بی1،بی 6، پوٹاشیم،میگنیشیم اور فولک ایسڈ کے علاوہ یہ سبزی ایسے مقوی عناصر سے بھرپور ہے جو کہ بلند فشار خون اور تناو میں کمی اور زیابیطس کے مرض کو قابو میں کرنے میں مددگار ہیں۔ یہ بھی دلچسپ ہے کہ بینگن میں سگریٹ جتنا نکوٹین پایا جاتا ہے۔ صحت کے لیئے ان گنت فوائد کے ساتھ رنگوں میں، اقسام اور شکل میں اور سائز میں اور مسحور کن ہنے کی وجہ سے یقیناَ بینگن میری پسندیدہ فصلوں میں سے ایک ہے۔                                            

ہم نے تجرباتی طور پر اپنے سکول میں بینگن کاشت کیئے۔ ہمیں اس میں بہت کامیابی حاصل ہوئی اور اگلے سال ہمارے طلباء یقیناَ انہیں کاشت کریں گے۔                                                

 آپ آسانی سے بینگن کاشت کر سکتے ہیں اور وہ ذائقہ حاصل کر سکتے ہیں جو لوگ صدیوں سے حاصل کر رہے ہیں۔  یقین کریں آپ ان کے گرویدہ ہو جائیں گے جب جامنی رنگ کے پھول نہائیت ہی عمدہ، چمکدار گہرے جامنی رنگ کی سبزی میں تبدیل ہو جائیں گے۔                             


Special  thanks to Mr. Adeel Anjum for translating this piece for our readers. We hope to see more translations from him in future.
 
To read this piece in English, please click on Eggplant, Aubergine or Brinjal

Sunday, 16 December 2012

Re-potting Chives


I started my Chive plants from seeds two years back. Just a few seeds germinated but over the years the tiny bulbs multiplied leaving the older plants with long and unpleasant base. It is time to re-pot.


 These plants were in a rectangular plastic container for past two years.  I decided to shift them to a deeper terracotta pot with new soil and well-rotted compost to avoid poor drainage and to encourage root development.

You can do the same with your Chives and other herbs by carefully lifting the plants without disturbing the roots . Use a fork if they don't come out easily. In Karachi, its best to do this during spring, monsoon or during very early winters.

Keep your new pot ready with some new soil mix. Transfer the Chives with long and unpleasant base a bit deeper than before. Cover with more soil and water softly. You Chives will look good as new. 

Now I have one pot of 2 years old Chives and the one of young Chives that are keeping away pests from my Rose vine.


'


I hope this helped you in some way.

Happy Gardening!
Zahra

Saturday, 15 December 2012

Recipe: Thin Crust Garden Pizza

Freshly picked herbs are the key ingredients
The delight of picking fresh produce from your own container garden is unmatchable. I love to cut a few springs of herbs, pull a green onion or two from a pot or to pick few limes from the tree in my container garden on my little terrace for the meals daily. My husband also loves to collect herbs and vegetables that we grow.

Recently, I just invented this thin crust pizza recipe using some herbs from my garden. It turned out really flavorsome and packed with appetizing fragrance. Here is the recipe for you.

For the Thin Pizza Base
For the pizza dough, combine 1 cup white flour with 1/2 cup plain flour with 1 tsp sugar, instant yeast and salt in a bowl. Add 1 1/2 tbsp olive oil and about 1 cup warm water. Mix softly using a paddle or hands. Knead until dough comes together and is smooth and elastic. Keep aside for 1-3 hours until it doubles. Later, divide this into two balls and softly roll them out to 1/2 in width. Transfer it on a lightly greased pizza pan.


For the Tomato Sauce
Select best 6 medium sized red riped tomatoes for this. Blanch them in boiling water for 3 minutes, peal off the skin, discard seeds and chop them roughly. Heat a pan and add 1 small finely chopped onion in 1 tbsp olive oil. Add 3-4 roughly chopped garlic cloves. Keep stirring until slightly golden. Add tomatoes and cook for another 2 minutes. Add salt, freshly crushed black pepper and 1 tsp of sugar. Keep stirring until the sauce becomes smooth and tomatoes are cooked. Let it cool down.

For the Topping
Pick your home grown vegetables for the toppings. I picked eggplants, capsicum and red and green onions. Chop them into small cubes, and stir fry them for a minute or two with black pepper, salt, chives, basil, thyme and a little rosemary. You can invent your own herb combinations.

Next, in a separate pan, heat some oil. In a bowl add 1 cup chicken breast cut into cubes, 1 tbsp ginger garlic paste and some seasoning. Fry chicken pieces on a medium heat until golden. Drain all the oil and let it rest for a while.


Preheat oven to the maximum setting 240C-300C. On one of your pizza dish that you prepared earlier, spread the tomato sauce evenly, add the vegetables  and chicken, add more roughly chopped herbs, a little shredded cheese of your choice and top it with a few basil leaves. Bake for 4 to 6 minutes until the base is puffy around the edges and crispy on the bottom. Repeat with the next batch.


Making food from home grown vegetables and herbs is so satisfying. It leaves you feeling light, fresh and healthy.

We would love to publish your recipe made from your home grown vegetables, herbs or fruits. Send it to crops.in.pots@gmail.com with a photo :) Join us on www.facebook.com/cropsinpot to meet with other vegetable growers around the world.

Happy Cooking!

Zahra


Friday, 14 September 2012

Bonsai Classes Begin


I am too excited to announce that we are restarting our bonsai making classes  with Pakistan's first certified Bonsai Master Khalid Suhail.


When & Where
Course begins from Sunday 7th October, 2012 at Maritime Museum, Karachi. We'll have sessions on every alternate Sunday from 9 am to 11 am.  

Basic Bonsai Making
We'll have 6 sessions of 2 hours over the period of 3 months during which students will learn history & types of bonsai, techniques of making a bonsai and plant selection. They will also get a chance to start their own bonsai project.

Advance Bonsai Making
If you have been taking Bonsai classes with Master Khalid Suhail, this might be the course for you.  Advance course will focus on lots of practical experience of making different types of Bonsais. Course fee will be Pkr 5,000 for 6 sessions that begins from Sunday 14th Oct, 2012.


Everyone interested is welcome to attend a free session on Sunday 16th September, 2012 between 9-11 am at Maritime Museum, Karachi. 


Let the fun begin! :)

Happy Gardening!


Saturday, 18 August 2012

Recipe: Palak Ki Roti


'Palak ki Roti' is a special treat for a monsoon day. This time we dint had a single shower but that shouldn't keep us away from the delicious "Palak ki roti"


Making Palak ki roti is simple. There are three steps. 

Step 1. Make Spinach Purée

Remove stalks from a bunch of fresh spinach leaves and wash them. Now put the leaves in a pan with 1/2 cup of water, 2 garlic cloves, 1 red whole chilli and a tsp cumin seeds. Simmer for 3 minutes. Next, let it cool for a few minutes and then blend it into a smooth paste. Keep it aside.


Step 2. Prepare Dough

Take 2 cups wheat flour and add a tbsp of olive oil to it and mix. Make a well in the centre and add the spinach purée to it. Gently bring the ingredients together and knead until the dough is firm. Add more water if its too dry or flour if its sticky. Allow it to rest for 1/2 and hour. 


Step 3. Roll a Roti 

Divide the dough into 2 inch balls. Heat the Tava or heavy based griddleon medium heat. Use extra flour to roll the balls into 5-6 inch diameter roti. Place it on the preheated tava, let each side cook for 30 secs or until it has lil brown spots. Brush extra olive oil or butter on top if you like :)

Palak ki roti tastes brilliant with grilled eggplant dip or garlic chutni and kachomar salad. 

I made these this month but without rains, they seem incomplete. Do make these to remember monsoons.


Thursday, 16 August 2012

DIY: Eid-able Pots


A beautiful pot deserves a perfect spot in your home, especially, when it is from the famous Satrangi designer, Fizza Ali, who happens to be my little sister :)

Designing "Truck Art" inspired pots its not exactly what Satrangi is famous for but Fizza can put chamak-patti on just about anything! Luckily, this time it was a set of pots for me. Dazzling vibrant tapes on coloured pots looked stunning and had to have a special purpose.

I had pots from Satrangi and super fast growing seeds from Muslim-Grower and a brilliant idea of growing Crops in Pots for EID. Here is a simple 3 steps to make your own Eid-able pots that you can proudly place on your dinning table on this Eid and inspire your guests.


DIY: Eid-able Pots

Things you will need:

  • A decorative 3-5 inch container
  • Fast growing herbs or lettuce vegetables such as mustard, cress, fenugreek , leaf lettuce etc.
  • Soil and compost mix 
  • Some coconut husk


Simply, fill your pots with soil mix, scatter seeds on the surface, cover with coconut husk and water gently.

Since, I planted mine just a week before Eid, I used Mustard (3-4 days), Fenugreek can be harvested in about 1-2 weeks and Cress that can be picked as early as a week.


Some ideas
  • You can also transplant your herbs into a beautiful container and place it nicely on your dinning table for special occasions. Of course, they can not live indoors so do bring them out in the sun after a day or two. Alternatively, place them near a sunny window indoors.
  • Do keep a tray under your pots to avoid water leakage.
  • Coconut husk is just to make it easy for the young plants to spring up. It also makes your pots looks neat and highlights the green foliage. You can use marble chips, gravel or beads once the seeds have sprouted and standing strong.
  • Do visit Satrangi for their collection of truck art accessories. And Muslim Grower to  meet and learn from vegetable growers from around the world.

Have a lovely Eid ! 

Happy Gardening!

- Zahra


Tuesday, 14 August 2012

Celebrating Pakistan


Lets redefine the colors of our flag today.
 White is love, peace and unity.

 Green represents sustainable growth,
 social equity and green economy. 

Happy Independence Day Pakistan!


Monday, 30 July 2012

Very Busy Bees


Every organic garden loves to have bees around. Bees are visiting my garden more than ever since I got these flowering pots. Its a simple joy to watch bees at work. Enjoy!


Do share your videos, photos, ideas and thoughts on organic gardening at www.facebook.com/cropsinpot 


Happy Gardening
Zahra

Sunday, 17 June 2012

Taro: A crop for flooded fields

Taro ( Arvi ) loves warm weather and lots of water to grow.

Hot Summer days might be unbearable for you, but some vegetables just spring into life during this time. Taro (Arvi) is one of them.

June seems to be just the perfect time to plant Taro in my container kitchen garden since we are expecting monsoon in a couple of weeks. This will bring lots of rain water for my Taro plants to grow into stunning huge plants. Some fields in Sindh might not have to wait for monsoons for Taro to be planted.

Badin on June 10th ,2012. Water from 2011 monsoon is still there!

Floods, during last monsoon, devastated many areas of Sindh in Pakistan. Badin, the most affected area, has still not recovered from it and the next monsoon is on the way. Acres of land is still under water, making it useless to grow any crop. I feel growing Taro must be experimented with there, as this might just turn into bliss for farmers who lost their land. The reasons are multiple, because of heavy rains, poor maintenance of drains across a very large region and criminal diversion of flood water to save certain fields. 


image of a Taro feild by http://photo.net/photodb/photo?photo_id=1022015
Since Taro loves lots of water and is grown in water, it seems to be an ideal crop for flood affected areasAccording to A K Khan's book, 'The Vegetables', Taro (Kachalo, Arvi) is grown from February to March and from October to November. Early varieties are harvested in 3.5 months while the late varieties are harvested in 5 months. From a 400 to 600 kilograms (kg) tubers, that will be used as seeds, farmer can expect an average yield of 60,000 to 80,000 kg per acre !

Imagine what profits farmers can gain from using flood water to grow Taro.

Although, this research seems to be a perfect solution, experts in growing Taro can share their expertise with NGOs and individuals who are trying to help villagers in the affected areas. 

 A fisherfolk community in Badin during a meeting with volunteers from the fisher folk forum and friends.
Pakistan Fisher Folk Forum is working in Badin with a village of fisherfolk to help them recover from previous monsoons, and to help prepare them to bear  next one. May be some of us can work with this same community and teach them to grow Taro!

Join us for a discussion on www.facebook.com/cropsinpot


Monday, 30 April 2012

Sunflower Guerrillas: Plant Some Sunshine


photo courtesy Shane Husain
Source image by
 guerrillagardening.com 
Guerrilla gardeners across Pakistan are planting Sunflower seeds on Tuesday, May 1, 2012 for the first time and you are invited! Since 2007, thousands of guerrilla gardeners around the globe get out of their homes and plant sunflower seeds wherever they find an appropriate space around their towns and cities.
The idea fascinated me and we decided to launch Sunflower Guerrilla Gardening Day in Pakistan. Crops in Pots  and Greener Karachi Trust announced the event and soon Caritas Pakistan joined in and offered free seeds for all guerrilla gardeners who join us. My kitchen garden group, Sarsabz Pakistan and Pakistan Sustainability Network are also working on hosting the event in their own cities. In the meantime, guerrilla gardeners from Karachi, Islamabad, Lahore are busy preparing for the day!


Why Sunflowers?
Sunflowers are not only loved for their bright and vibrant colours, they are also valued for their ability to improve the ground soil by acting as a green manure and by suppressing weed growth. The stunning flower is rich in nectar and pollen that attract beneficial insects, especially butterflies, and improves bee forage in the summer. A single sunflower plant looks just as striking as when these massive flowers are bunched together in a group. The best part is that sunflower seeds are an excellent source of Vitamin E.
Since sunflowers are native to Pakistan, seeds are very cheap and available in most general and horticulture stores. Sunflowers are drought resistant which makes them ideal for Karachi. And birds love to eat them.


How to plant sunflower seeds?
Simply use a screw driver or a fork to loosen the soil. Add a handful of fresh compost if the patch is too sandy. Now simply sow your seeds two inches deep and cover them with soil. You might want to put a sign there just to know where exactly you planted the sunflower seeds. Water the space well and then come back to see the progress in a week’s time. Some seeds will sprout in a day or two, while some will take as long as two to three weeks.
Blooming time depends on the variety you get. Some dwarf sunflowers will flower in two months and the huge six-eight feet tall flower heads will develop in three to four months time.


How you can participate?
Do it solo or make a group. You can plant sunflowers anytime during the day. Luckily May 1 is a public holiday so you don’t have to worry about the timing and traffic. If you recruit your friends, you will be able to cover a larger area as a group. Make sure you send us your photos, videos and most importantly share your experience with us at Crops in Pots.


What you will need?
All you need is some sunflower seeds, something to dig with, water and some compost. If you join us in Karachi (the venue will be announced on our Facebook page), Caritas will have free seeds for you.


How to select a spot?
The idea is to beautify your roadsides, ugly roundabouts, weedy tree pits, a neglected neighbourhood garden or simply any spot that can use a bit of brightness. Ideally, the spot should not be too dry and sandy so that the sunflowers aren’t weeded away. Pick a spot that is near your work or home or a street, which you pass by every day, so that you can easily stop by and water your plants.


Some more ideas:
-Use coconut husk along with compost to retain moisture
-If you feel watering can become an issue, then you can use an empty plastic bottle with a hole in the bottle-cap. Cut the bottom, invert it and fix it near your plant, fill it with water. It will keep dripping for a few days.
-If you don’t know which variety you are planting, don’t worry! Trust me this will turn out to be very exciting.
-Make this a family or friends get-together or host an event in your school. This can become an excellent community activity for your NGO as well.
-Take a picture with your sunflowers and show it to everyone! Don’t forget to tag us!
Our country needs some brightness and lots of bright sunflowers growing around us will definitely make a difference. Become a guerrilla gardener this summer, and sow some brightness across your town!


Happy gardening! 


Event page: https://www.facebook.com/events/198523463587164/
email us @     crops.in.pots@gmail.com


published on the Newsline Magazine on April 30th 2012

Saturday, 11 February 2012

A Zero-budget & Low-carbon Vegetable Garden

Organically grown Turnip   Photo: Zahra Ali


What if I tell you that you can grow your very own vegetable garden without spending a penny but still earn profits of thousands of rupees per month with the added bonus of reducing your carbon footprint to almost zero? No kidding, it’s true!
 
Reduce carbon: produce more

We all know that uncontrollable CO2 emissions have ruined our natural environment beyond our imagination and knowledge. Sadly, no matter how much we appreciate and value this planet and the life on it, we have had a major part in gravely harming it.

It is time to put things in order.
Home grown Carrots by Siam Rizwan

Even little things, such as consuming farm-grown food, contribute additional CO2 to the environment, and that means we often spend our hard-earned money on things that are detrimental to our planet and our lives. By saying this, I do not aim to discourage the consumption of all farm produce, but I do strongly discourage buying from inorganic farms.
 
Unfortunately, most of the vegetables available to us come from inorganic farms with high carbon footprints because they use lots of dirty, carbon-based energy to run farm machinery as well as heavy pesticides and chemical fertilizers with known perilous effects on not only human health but also on the Earth’s environment. Once this produce is harvested, vans, trucks, trains, ships or planes, which all release high amounts of carbon into environment, distribute the food to our markets. And let’s not forget the energy used in packaging and by our cars that carry us back and forth from grocery stores.
But there is good news. You can reduce your carbon emission by 1lb per square foot of a vegetable garden over an entire growing season!
Islamabad: Eggplants growing in a sack at Nadeem Iqbal's organic garden   Photo: Zahra Ali

A zero-budget vegetable garden

Starting a vegetable garden is easy. Organic compost, seeds, planters and a sufficient supply of water are the main items needed. Normally, you would have to spend money on these things to get your garden going. But here are some ideas to grow a vegetable garden without spending a penny:
  1. Prepare your own compost by reusing newspapers, wood shavings, used tea bags, vegetable and fruit peelings, eggshells, plant cuttings, etc.
  2. Save seeds from your homegrown heirloom vegetables and herbs to use the next growing season.
  3. Reuse empty sacks, bags, plastic bottles, tires and buckets, and just about anything else that can hold 6-12 inches (15-30cm) of soil and has a drainage hole, as planters in which to grow vegetables and herbs.
  4. Reuse water used for washing dishes and vegetables to irrigate your garden.
Plastic Bottle Towers by Willem Van Cotthem

If you do not have a plot to start a vegetable garden, consider designing a container garden on your rooftop, balcony, terrace or windowsill. Vertical farming is a growing practice across the world that allows individuals with limited space to create bigger gardens and thus achieve larger yields.

Most of us will not be able to grow enough vegetables to fulfill our daily consumption, but we can definitely reduce our bills and CO2 emissions greatly.
For every 10 lb (4.5 kg) of tomatoes grown at home, you save 20 lb of carbon emitted into the environment and hundreds that you spend in buying it. 

So why not start a vegetable garden before World Environment Day on 5 June 2012? It’s easy and rewarding, and you’ll join the many other people around the world who have made small changes to their lifestyles in order to make a big difference to the planet. 


for more reading:

Reuse, Recycle and Produce: Bottle Gardening in Karachi

How, where and when to plant seeds

Green Economy  Initiative

World Environment Day 

Carbon Footprint Calculator

Tree Hugger

Special thanks to Talib Qizilbash.


Tuesday, 7 February 2012

Reuse, Recycle and Produce: Bottle Gardening in Karachi

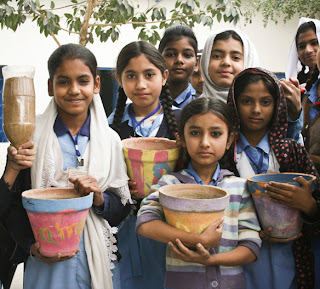
A new generation of green thumbs: Students pose with their base pots and a plastic bottle filled with potting mix (left). Photo: Yasir Husain


In December, I came across Willem Van Cotthem’s video tutorial on how to construct a bottle-tower garden to grow herbs and vegetables. It is a simple and effective tool in the global fight against hunger and malnutrition.

Willem Van Cotthem is a botany professor at the University of Ghent in Belgium and has brilliant ideas on how to use plastic bottles to create gardens. By recycling large plastic bottles to create vertical “tower gardens,” professor Van Cotthem has provided an inexpensive method to grow vegetables and herbs using a minimal amount of space, water and fertilizer.

Overwhelmed by inspiration, I initially shared a link on the Crops in Pots Facebook page from my home in Karachi. Soon Rubaba Waqar, an urban farmer from Islamabad, linked us with Nighat, a volunteer teacher for a government school in Karachi who was enthusiastic to have gardening classes for her students. So I thought, “Why not combine both ideas together and create something wonderful for this school?”

To test the idea first, I followed the instructions in Van Cotthem’s video and made my first bottle tower for my garden. It hardly took me 15 minutes to have something so beautiful and simple to plant my food in. Soon after, I made an announcement on Crops in Pots, asking for volunteers to come forward and help me make a bottle-tower garden for this Karachi government school.
Top-down approach: Zahra Ali helps a student set up a tower. “I think Pepsi, Fanta and 7up bottles never looked better,” says Zahra. Photo: Yasir Husain
Amazingly, some very talented urban farmers not only showed interest but also contributed material for the project. Nasreen Ashraf from Amateur Gardener’s Club bought some herb and vegetable seedlings, Mansha Noor from Caritas Pakistan contributed seed packs for each student, while talented vegetable grower Yasir Khan brought some herb seeds and canes for the structure. Meanwhile, I gathered some vegetable pots for inspiration and some other basic things we might need. Nighat, from the school, arranged for the sand and bottles.

We met at the Government School for Girls in Clifton right opposite to the shrine of Abdullah Shah Ghazi at 10am on January 24, 2011. In our audience were grade four and grade five students. We took turns talking to them and started to build the first tower. We cut the bottoms off of each bottle, inverted them, filled them with our potting mix and stacked them one on top of another so that water from the top would drip down through each bottle planter. Then we cut little windows into each bottle and started planting.

The girls loved the idea. Most of them live in Neelum Colony, which is right behind the school. It’s so densely populated and overcrowded with houses that finding a place to grow vegetables seems unimaginable. The “bottle tower” was a perfect solution for them. It takes just a few inches of space horizontally but can be made as tall as one likes. The best thing about it is that it works on a drip irrigation system with the help of gravity, and thus one tower requires as little as one glass of water every two days! To make sure every student had the chance to participate, students were asked to get bottles from home, while the seeds were provided to them and a volunteer supplied the soil and manure for anyone interested. We planted salvia, marigold, petunia, mint, tomatoes, coriander, fennel and fenugreek.

I will never forget the glow of their faces. I could see in them the same eagerness to experiment and grow food that I had when I discovered this project, and so I was compelled to ask them each to teach at least three more friends how to make a garden out of a “bottle tower.” I could see the idea spreading in their community. One of the girls said, “Hum aaj ghar jakeh zaroor beej lagain gae” (“We’ll definitely sow seeds today at our homes”), and many more of them repeated this sentiment.

It helps that this gardening method is inexpensive to implement. In total, a bottle tower comprising 25 plastic bottles costs around Rs250. One can easily get a bag of sand and manure mix for under Rs200, which will be enough for 25 bottles. Seeds can be bought for around Rs1/seed. And while some people might need a few canes to support the towers, a tower can also be tied to a grill that you already have. Moreover, you can bring the bill down near to zero by using homemade compost, saved seeds from homegrown tomatoes or other vegetables, herbs or flowers. A bottle tower needs almost a glass of water each day or every other day but even that cost can be reduced to zero by using water from your kitchen. It’s this awesome!

It is amazing to see how a few clicks helped me connect with so many different people who I had never before met, and how a simple video made in Belgium inspired us here in Pakistan. I have become a fan of the virtual world and of its ability to plant ideas across the globe.

It started from Belgium and came to us in Pakistan. We taught 50 young girls here, and now it’s on display for hundreds of more students from the same school. Imagine 50 poor families with a kitchen garden of their own: its astonishing how fast ideas can grow and spread.

Why not do something similar in your neighbourhood, or in a nearby underprivileged area?


This article was published on the Newsline Magazine on 6th Feb, 2012. 
more about bottle towers here 

Saturday, 4 February 2012

Grow food towers

A special video made by the person who inspired us to do this project! ( more details soon )


( the original video that inspired us)

Tuesday, 17 January 2012

Recipe : Spinach Kofta with Yellow Curry


Your home-grown vegetables needs special recipes. Here is one that I enjoyed. Its inspired from a cook book called " Great Tastes: Indian " by Bay Books.


Yellow Curry
1 cup plain yogurt
4 tbsp besan( chickpea floor)
1/2 tsp chili powder
1 tsp ground turmeric 
1 tsp fenugreek seeds( meethi dana)
2 tsp black mustard seeds
8 curry leaves
4 cups water


Spinach Kofta
400 gms spinach leaves steamed 
1 cup besan
1 medium sized onion finely chopped
4 garlic cloves crushed
1 tsp cumin powder
a spring of fresh coriander leaves


Bhagaar (optional)
2 tbp oil
1 onion thinly sliced
3 whole dry red chilies
6 curry leaves
a pinch of cumin seeds


Yellow Curry
1. Mix together yogurt, besan and water in a bowl. 
2. Heat oil in a deep, heavy base pan and add fenugreek seeds, mustard seeds and curry leaves. Stir fry for a minute. 
3. Add chili powder and turmeric powder and stir for a minute.
4. Add yogurt mixture and mix well. Season with salt and let it cook on medium heat until the mixture is little thick. This will take around 15-20 minutes.


Spinach Kofta
5.  Blanch spinach leaves in boiling water for a minute and then refresh in cold water. Squeeze as much water possible.
6. Chop spinach and mix remaining ingredients using little water. Make a soft mixture that can easily turn into a ball.
7. Heat oil in a pan and shallow fry spinach koftas until lightly browned.


Combine koftas with yellow curry before serving. Prepare bhaghaar for more flavor and finish. 


Heat oil in a frying pan and add onion. Stir until its golden browned. Add remaining ingredients and cook for 30 seconds. Add bhaghaar to your dish. 


Serve with roti or boiled rice.


*Caution!
Be careful when adding bhaghaar to the curry. Oil 


If you have a recipe that you would like to share with us, post it on www.facebook.com/cropsinpot with a picture. 


further reading

crops in pots